

السلام عليكم ورحمة الله وبركاته

:الدرس يحتاج نوع من الدقه
هنآ توضيح فيديو
{ اضـــــــــــــــــــــــــــــــــــــــــغـــــــــــــــــــــــــــــــط هـــــنـــآ }

الخميس، 9 يونيو 2011
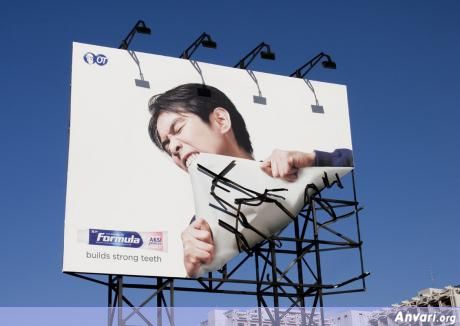
أصبحت الإعلانات جزءا من حياتنا ، تفرض نفسها علينا في الصحيفة والمجلة ، كما تفاجئنا بوجودها في الراديو والتفزيون والسينما ، وأخيرا وجدت الإعلانات طريقها إلى مواقع الإنترنت . وللإعلانات دورها المهم في حياتنا ، كما أن لها آثارها السلبية والإيجابية .

نشاط اقتصادى
الإعلان Advertising هو وسيلة للدعاية تهدف لإقناع المستهلكين بشراء أو استهلاك سلعة أو خدمة معينة ، والشق الأعظم من الإعلانات في وقتنا الحالي تقوم به شركات متخصصة نطلق عليها "وكالات الإعلان" ، حيث تلجأ الشركات التي ترغب في الترويج لسلعها أو خدماتها لإحدى هذه الوكالات ، وتقدم لها المعلومات الكاملة عن هذه السلع والخدمات ، وتقوم الوكالة بتصميم الإعلان وإخراجه في الشكل المطلوب ثم عرضه من خلال الوسائل المختلفة .
وقد أصبح الإعلان نشاطا اقتصاديا ضخما أنفق عليه العالم 385 مليار دولار أمريكي في سنة 2007 ، ومن المنتظر أن ينفق عليه أكثر من 450 مليار دولار سنة 2010.

وسائل إعلان مبتكرة
مع تطور الحياة الإقتصادية وتنوع وانتشار وسائل التكنولوجيا الحديثة ، حدث تطور مماثل في وسائل الإعلان ، ونشأت وسائل لم تكن موجودة من قبل ، مثل الإعلانات التى تتخلل الأغانى والأفلام على شرائط الفيديو أو اسطوانات الـ CD أو الملصقات التي توضع في محطات المترو والقطارات ، والإعلانات التي تطبع خلف بطاقات حضور المناسبات المختلفة ، كما أدخلت شركات الإعلان وسيلة جديدة بالتعاون مع شركات الإنتاج السنمائي والتلفزيوني ، حيث يستخدم النجوم المشهورون أثناء الأحداث أنواعا معينة من الملابس ، أو يركبون ماركات معينة من السيارات ، مما يعطي لهذه الأنواع والماركات شعبية كبيرة عند الجمهور . وكذلك يعتبر ارتداء نجوم الرياضة لملابس ذات ماركة معينة إعلانا عن هذه الماركة .
سلبيات وإيجابيات
تتعرض الإعلانات لكثير من النقد، فقد أصبح الكثيرون يشكون من أن الإعلانات تفرض عليهم دون إرادتهم ، في الراديو والتلفزيون والسينما ، وعلى اللوحات الإعلانية في الطرق العامة ، وتقفز في وجوههم كلما فتحوا الصحف والمجلات ومواقع الإنترنت . كما يقول الباحثون إن الإعلانات تشجع على الاستهلاك غير الضروري ، وتنمي عادات غير صحية في تناول الطعام والشراب ، وتؤدي أحيانا إلى مشكلات عائلية ناتجة عن رغبة الأطفال في شراء منتجات لا تتحملها ميزانية الأسرة .
من ناحية أخرى فإن الإعلانات تلعب دورا إيجابيا في حياتنا ، مثل التوعية بالأمراض الخطيرة وطرق الوقاية منها وعلاجها ، والإرشاد إلى سبل المحافظة على البيئة ، ونشر العادات الاجتماعية والتربوية الإيجابية وغيرها .


إعداد : حمدي أبو كيلة


احب أنوه أن مفتاح فهم الفوتوشوب و استخدامه بحرفيه هو شىء واحد لا غير : التطبيق ثم التطبيق ثم التطبيق
لو أمضيت عمرك كله تقرأ كيف تصمم هذا و كيف تصنع هذا و لم تطبق فأنت ابدا لن تتعلم شىء
لذا إن كنت تريد الاستفادة من هذه الدورة فعليك بالتطبيق على كل درس، و لا تكتفى بتطبيق واحد بل طبق اكثر من مرة و لا تتردد فى سؤالى عن أى شىء تريد
ملخص درس اليوم
ينقسم درس اليوم إلى قسمان
1-التعرف علي انواع الملفات في الفوتوشوب
2-عناصر التصميم الناجح
3-درس فيديو للتعرف علي واجهة البرنامج و
كل ما يخص البرنامج
-التعرف علي انواع الملفات في الفوتوشوب
نوع الملفات في -التعرف علي انواع الملفات في الفوتوشوب
نوع الملفات في الفوتوشوب يدل علي خصائص معينه للملف وامكانياته وحدوده ،و بالنظر الي برانامج فوتوشوب نجد انه يتعامل مع العديد من الملفات (الصور) ولذللك سوف نقوم باستعراض سريع لاهم انواع الملفات التي يدعمها برنامج فوتوشوب:
1- ملفات ذات امتدادات (psd , pdd)
هذه الملفات تسمي الملفات المفتوحه وهذه الصيغه تحفظ الملف بالحفاظ علي الطبقات والقنوات اي انه يمكنك من تعديل التصميم في اي وقت تريد
2- ملفات ذات الامتداد (GIF)
هذه الصيغه تم تصميمها بواسطه كمبيوسيرف لتعتمد علي حجم صغر للملف وينتشر هذه الصيغه في تصميم صفحات الويببسبب صغر حجم ملغاته
3- ملفات Jpeg
4- ملفات photoshop pdf
5-ملفات png
6- ملفات tiff
..
يدل علي خصائص معينه للملف وامكانياته وحدوده ،و بالنظر الي برانامج فوتوشوب نجد انه يتعامل مع العديد من الملفات (الصور) ولذللك سوف نقوم باستعراض سريع لاهم انواع الملفات التي يدعمها برنامج فوتوشوب:
1- ملفات ذات امتدادات (psd , pdd)
هذه الملفات تسمي الملفات المفتوحه وهذه الصيغه تحفظ الملف بالحفاظ علي الطبقات والقنوات اي انه يمكنك من تعديل التصميم في اي وقت تريد
2- ملفات ذات الامتداد (GIF)
هذه الصيغه تم تصميمها بواسطه كمبيوسيرف لتعتمد علي حجم صغر للملف وينتشر هذه الصيغه في تصميم صفحات الويببسبب صغر حجم ملغاته
3- ملفات Jpeg
4- ملفات photoshop pdf
5-ملفات png
6- ملفات tiff
..
-عناصر التصميم الناجح
1- الفكره او مرحله ما قبل التنفيذ:-
وهي اساس التصميم وما يقوم عليه فبدونها لا يوجد تصميم ويجب ان تكون الفكره واضحه في ذهن المصمم وان يعمل علي اساسها ويحاول ابرازها ولتصميم ناجح يجب ان لا تكون الفكره سطحيه
2- مرحله التنفيذ:
وفيها عناصر عده وهي ادوات تنفيذ تصميم ناجح ويمكن تلخيصها في الاتي (الالوان - الخط - الصور" ان وجد" ).
لتصميم ناجح لا بد من انسجام هذه العناصر الثلاثه مع بعضهما وليس انسجامها فقط بل ولابد ان يكونوا متناغمين مع الفكره محققين لمبتغاها
3- مرحله ما بعد التنفيذ :
وهذه الفكره تكون عند انتهاء التصميم فيبدأ المصمم الحكم علي العمل النهائي له فيسأل نفسه هل ادي الغرض من التصميم ؟,وما هي نقاط القوه والضعف؟ . وكيف يكمن ان يستفيد من هذه النقاط.
.......
.....
واليكم درس الفيديو هذا الذي من خلاله سوف ناخذ جوله علي البرنامج لنتعرف علي كل شئ به

RAPIDSHARE
http://rapidshare.com/files/35906717...ed_Gerrard.rar
وهذا رابط اخر للدرس
http://arabsh.com/bbybwaurgz0i.html
mediafire
http://www.mediafire.com/?dtmgjyjzfqi
المطلوب منكم اليوم هو أن يختار كل واحد منكم تصميم أو اكثر من شبكة الانترنت
و يضعه هنــا ثم يقوم بنقده، بمعنى أن يقول هل فكرة التصميم واضحة، و هل الألوان متناسقة مع بعضها، هل الخط مناسب؟!! و هكــذا
البوم صور خلفيات زفاف جميلة جدا/Wedding Backgrounds
البوم صور خلفيات زفاف جميلة جدا/Wedding Backgrounds
لتحميل خلفيات الزفاف
تصاميم متعددة الرؤيا لشعارات جاهزة مجانا فقط قم بالتعديل لتناسب الشعار الذي تريده
لتحميل ال PSD

اضغط هنا
لتحميل ال PSD
اضغط هنا
تصميمات ثلاثية الأبعاد بصيغة PSD سهلة التعديل
......
.....
.....
.....
....
....
................................
للتحميل:
الرابط الأول: تحمل الرابط من هنا
كلمة السر:
......
.....
.....
.....
....
....
................................
للتحميل:
الرابط الأول: تحمل الرابط من هنا
كلمة السر:
itjo.net
الأربعاء، 1 يونيو 2011
Here is a preview of the final effect: (click to enlarge)


Ok Let’s get started!
To complete this tutorial, you will need the following stock:
Metal Texture

Duplicate this cloud layer once, compress it down then rotate it as shown below with the free transform tool:

We will use this new cloud layer as a guide for our text base – so increase the opacity to around 30% for it. And you will have the following effect:


Copy and paste the selection into our document, rotate it a bit as shown below:

Grab a soft eraser with the opacity and flow set to both around 40%, gently erase the edges of the metal texture to give it a little more depth.

Center Portion:

Bottom Right Corner:

You will have the following similar effect as a result:

So let’s go to the metal image, use the quick selection tool to select a few random pieces from the image, as shown below:

Double click the background layer to unlock it:

Then go to Edit > Define Brush Preset to create a new brush preset:

Once you defined a new brush set, press F5 and bring up the brush windows, apply the following settings:
Shape Dynamics

Scattering

Make sure you tick the “Protect Texture” option on the brush window.
Use this brush as an eraser, reduce the tip size to a small scale, erase the following areas of the metal texture on our document:
Center

Bottom Right

Top Left

Then add the following two adjustment layers as clipping mask to the metal texture layer:
Levels

Black and White

Layer mask on the Black and White adjustment layer:

and you will have the following effect so far:

You can use this particle brush to paint around the following areas for the shatter effect:


Again we select a piece of metal texture with the Quick Selection Tool:

Copy and paste the selection onto our document, resize and fit it to our letter:

Repeat the steps above and apply more metal texture to the letter:

When you’re happy with the shape, hide the original white text, and merge those layers and use a soft erase to remove the edges of the letter:

Make sure you erase the bottom of the letter as well, so it blends into the base:

Add the following 3 adjustment layers as clipping mask to the letter texture:
Levels

Black and White

Layer mask on Black and White adjustment layer:

Curves

Use the particle brush we created in previous step, paint some shattered pieces around the letter:

Here is the effect so far:


I also added some more particles around the base texture:


Plus a few more spot lights around the letter:

You can also adjust the contrast a bit with a brightness and contrast adjustment layer, and here is the final effect I have for this tutorial:(click to enlarge)
You can choose your own color scheme and experiment with the result – I used a dark red kind of effect.
That’s it for this tutorial! Hope you enjoy this tutorial and find it useful! Till next time, have a great day!

PSD File Download
You can download the PSD File for this tutorial via the VIP Members Area for only $6.95/Month (or less)! You will not only get this PSD File, but also 70+ other PSD Files + Extra Goodies + Exclusive Photoshop tutorial there. Signup now and get exclusive :) Find out more about the VIP Members AreasOk Let’s get started!
To complete this tutorial, you will need the following stock:
Metal Texture
Step 1
Create a new document with black background (size doesn’t really matter for this tutorial, I used 1200px * 700px). Create a new layer on top of the background layer and set the opacity to around 20%, render some cloud with the cloud filter on it:
Duplicate this cloud layer once, compress it down then rotate it as shown below with the free transform tool:
We will use this new cloud layer as a guide for our text base – so increase the opacity to around 30% for it. And you will have the following effect:
Step 2
Load the metal texture image into Photoshop, use the quick selection tool to select a random piece of the texture:Copy and paste the selection into our document, rotate it a bit as shown below:
Grab a soft eraser with the opacity and flow set to both around 40%, gently erase the edges of the metal texture to give it a little more depth.
Note: The following 3 screenshots indicate the Top Left, Center, and Bottom Right area of the metal texture.Top Left Portion:

Center Portion:
Bottom Right Corner:
You will have the following similar effect as a result:
Step 3
Now let’s make a particle brush with this metal stock image. If you have followed psdvault.com for a while, you will know that I love making those kind of brush for all sorts of effect :)So let’s go to the metal image, use the quick selection tool to select a few random pieces from the image, as shown below:
Double click the background layer to unlock it:
Then go to Edit > Define Brush Preset to create a new brush preset:
Once you defined a new brush set, press F5 and bring up the brush windows, apply the following settings:
Shape Dynamics
Scattering
Make sure you tick the “Protect Texture” option on the brush window.
Use this brush as an eraser, reduce the tip size to a small scale, erase the following areas of the metal texture on our document:
Center

Bottom Right
Top Left
Then add the following two adjustment layers as clipping mask to the metal texture layer:
Levels
Black and White
Layer mask on the Black and White adjustment layer:
and you will have the following effect so far:
You can use this particle brush to paint around the following areas for the shatter effect:
Hint: make sure you reduce the brush tip size to a smaller scale, and set the brush flow and opacity to around 50%, DO NOT paint too much particles.
Step 4
Now let’s move to the text part. Type a letter onto the canvas as shown below: (Font choice doesn’t matter here, we only use this as a guide for our texture)Again we select a piece of metal texture with the Quick Selection Tool:

Copy and paste the selection onto our document, resize and fit it to our letter:

Repeat the steps above and apply more metal texture to the letter:

When you’re happy with the shape, hide the original white text, and merge those layers and use a soft erase to remove the edges of the letter:

Make sure you erase the bottom of the letter as well, so it blends into the base:

Add the following 3 adjustment layers as clipping mask to the letter texture:
Levels
Black and White
Layer mask on Black and White adjustment layer:
Curves
Use the particle brush we created in previous step, paint some shattered pieces around the letter:
Here is the effect so far:
Step 5
We’re almost done! For some final retouches, I smart sharpen the image a bit after flattening the layers:
I also added some more particles around the base texture:


Plus a few more spot lights around the letter:

You can also adjust the contrast a bit with a brightness and contrast adjustment layer, and here is the final effect I have for this tutorial:(click to enlarge)
You can choose your own color scheme and experiment with the result – I used a dark red kind of effect.
That’s it for this tutorial! Hope you enjoy this tutorial and find it useful! Till next time, have a great day!
الاشتراك في:
الرسائل (Atom)